Exchange 2007 configuration
This guide shows the steps necessary to configure a newly installed Exchange 2007 server for receiving internet email via POPcon or POPcon PRO and for sending out emails to the internet.
Basically you need to perform these simple steps:
- Add your own internet domain to the “Accepted Domains” list
- Configure a Send Connector for outgoing emails
- Configure a Receive Connector for incoming emails (from POPcon) without Authentication
- Assign email addresses to individual users in the active directory
- Installing and configuring POPcon, Exchange POP3 Connector
This document is also available in other languages:
Français
/ Italiano
/ Deutsch
/ Español
/ Português
1. Add your own internet domain to the “Accepted Domains” list
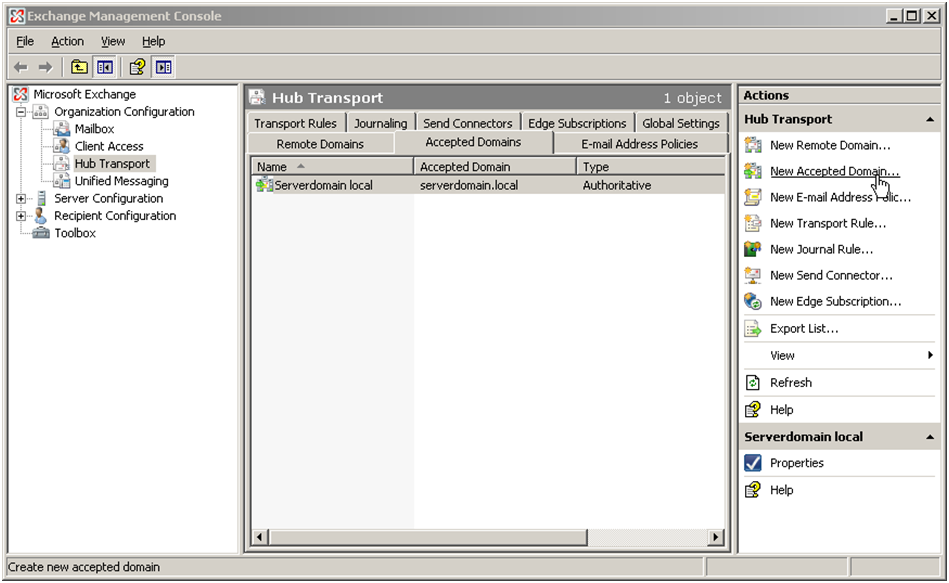
Open the Exchange Management Console and select Organisation Configuration, Hub Transport.
In the middle pane select the Accepted Domains tab. There already will be one local domain configured here. You can leave it.
Choose New Accepted Domain in the Actions pane.
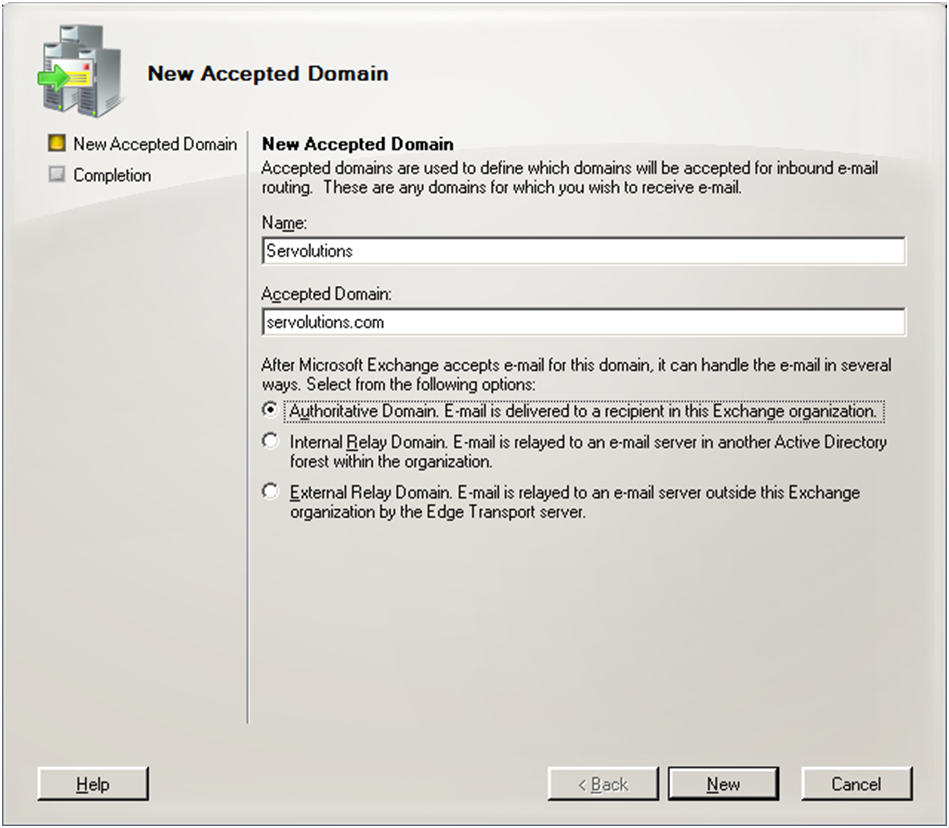
Choose a name for this domain (not important) and enter your internet domain name (in a domain.com format without @ or *@) as Accepted Domain.
Also, select Authoritative Domain to tell Exchange to accept internet emails for this domain name and to tell Exchange that it is responsible for the whole domain.
Remark: In the rare case where you want to only handle part of a domain in your Exchange, i.e. you only have a few email addresses of this domain in your Exchange and need Exchange to send out email to the internet for all other addresses inside this domain please select "External Relay Domain" instead to tell Exchange to accept internet emails for this domain name and to tell Exchange that it is responsible for only part of the domain.
2. Configure a send connector for outgoing emails
The send connector is used to pipe outgoing emails from Exchange via your providers SMTP relay server to the internet.
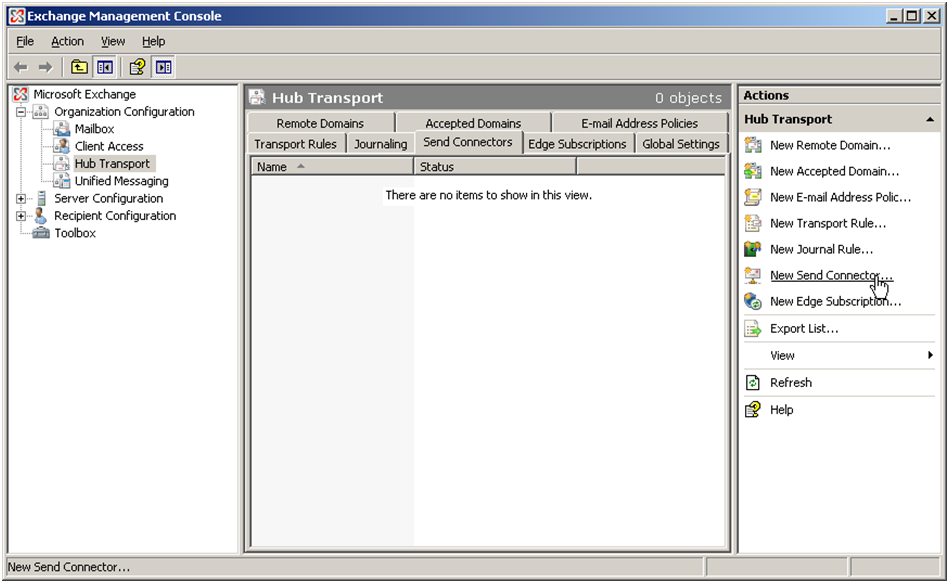
Select Organisation Configuration, Hub Transport in the Exchange Management Console.
In the middle pane select the Send Connectors tab. And in the Actions pane click on New Send Connector
We will add a new send connector. Choose any name (not important for the function) on the first page:
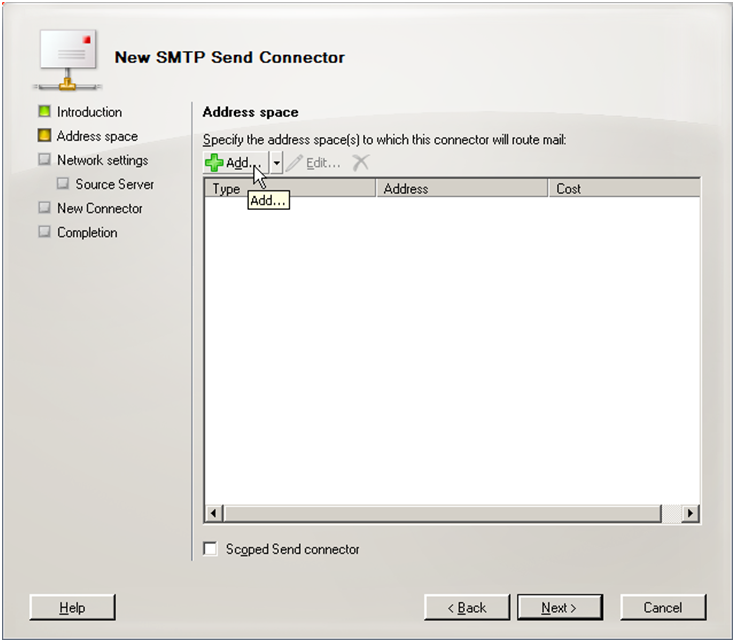
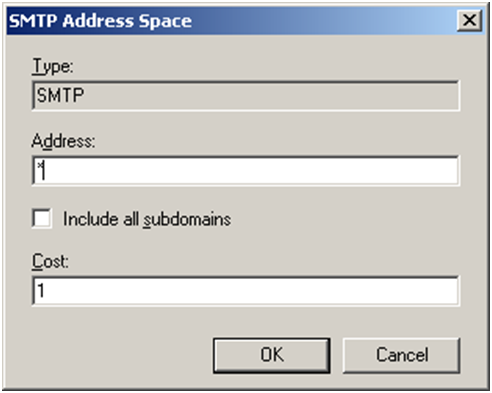
On the next wizard page we need to specify an address space to be served for this connector.
The address space „*“ means this send connector is sending out email to any domain on the internet. You can build additional specific send connectors for other target addresses, like “*@sistercompany.com” if there are special routing requirements. This allows your to instruct our Exchange server to use a different e-mail server (smart host) to send e-mails depending on the domain you send to. Unfortunately this is seldom useful and does not allow different smart hosts depending on the sender domain. If you want that please check out our MultiSendcon, the multi-domain send connector for Exchange
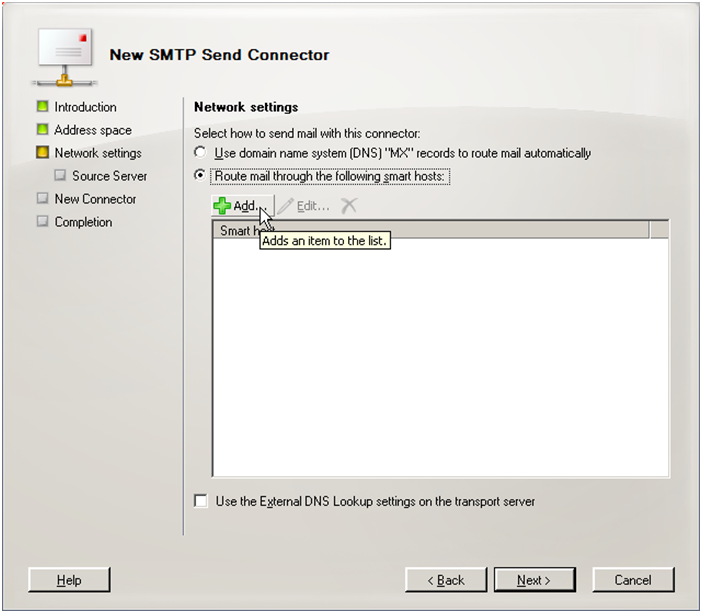
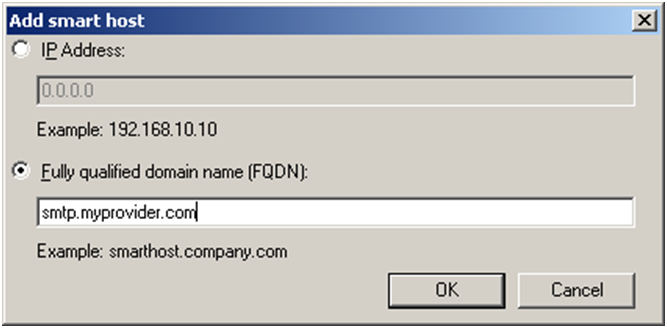
On the next page we switch the configuration to Route email through your provider SMTP relay server (Smarthost in Exchange terms) and add the provider server address.
The other option (use DNS without a relay server) can only be used when you are connected on a fixed IP address and host the webpages yourself.
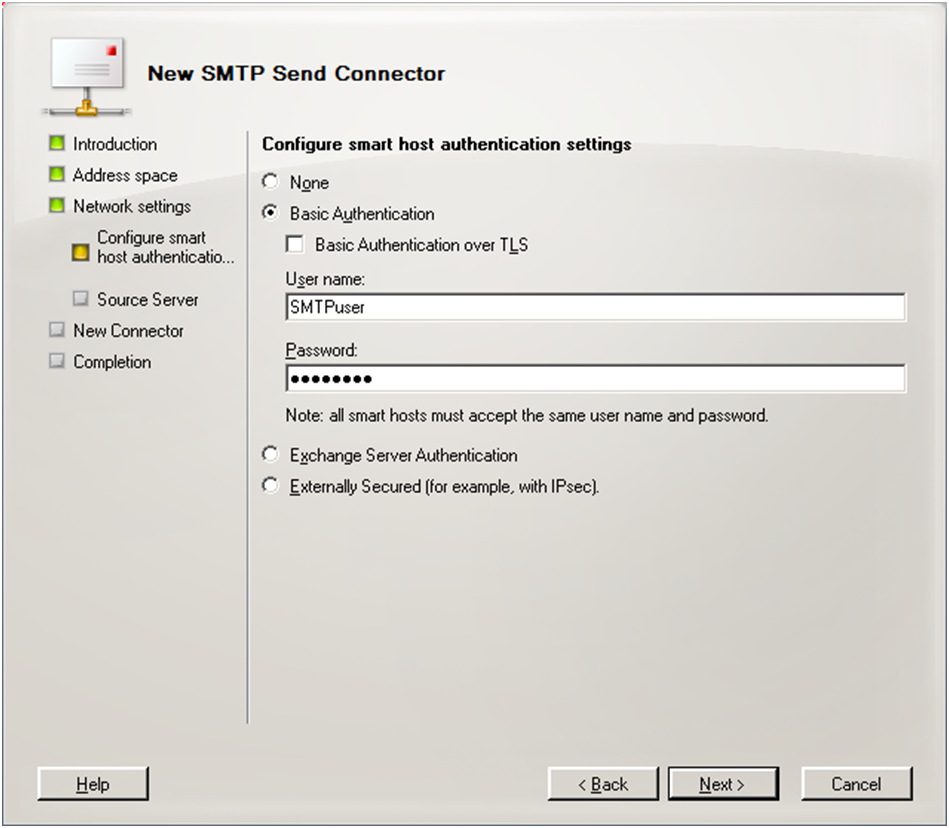
The last page of the wizard is needed to enter the provider SMTP relay servers username/password credentials. Almost all provider servers require you to log in before you can use their relay servers to send out email to protect against spam senders. It does not matter which users login data you use, this will not change the email content. Any provider SMTP server login will do.
3. Configure the receive connector for incoming email
POPcon uses SMTP to forward emails to Exchange. For this to work we need to change two Exchange 2007 default configuration settings: The maximum email size is fixed to 10MB here and we need to add the anonymous user to the permission group in order to allow POPcon to transfer email.
Important: You also need to make sure to not install the Windows "Simple Mail Transfer Protocol" service. This service could block the Exchange SMTP transport from actually answering the SMTP IP port (25) and could cause Emails to loop back to the internet if installed. Check Administrative tools, Services and disable this service.
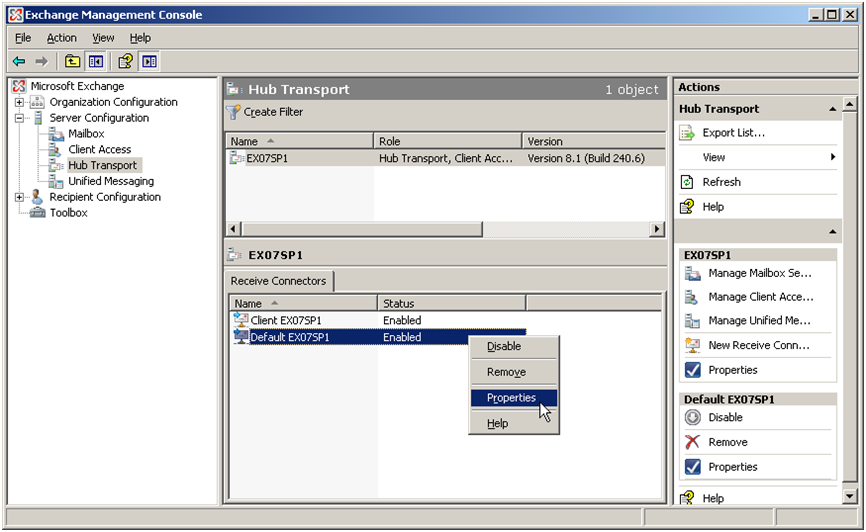
We can find these configuration settings under Server Configuration, Hub Transport, Receive Connectors, Properties of the Default Receive Connector:
The maximum message size is fixed to 10240KB (10MB) by default on the General tab of these properties. Change that to 102400 (100MB) in order not to allow longer emails to come through. You can always limit individual user’s allowed maximum email sizes.
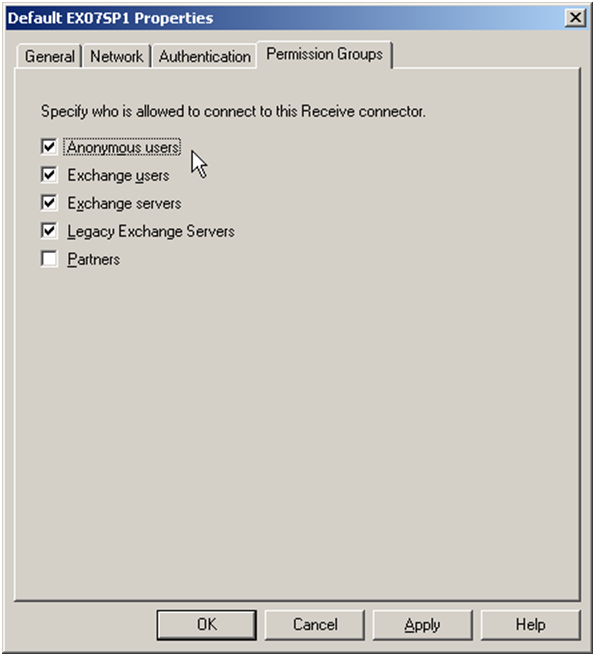
We also need to add the Anonymous users to the Permission Groups tab in order to allow POPcon to connect to this receive connector at all.
4. Assign email addresses to users in the active directory
All you need to do now is to add SMTP email addresses to users in the active directory. Users can have more than one SMTP address, for example they can have info@yourcompany.com in addition to jeff.smith@yourcompany.com.
Exchange provides the convenient E-Mail Address Policies feature that allows you to assign identically formatted email addresses to all (including future) users.
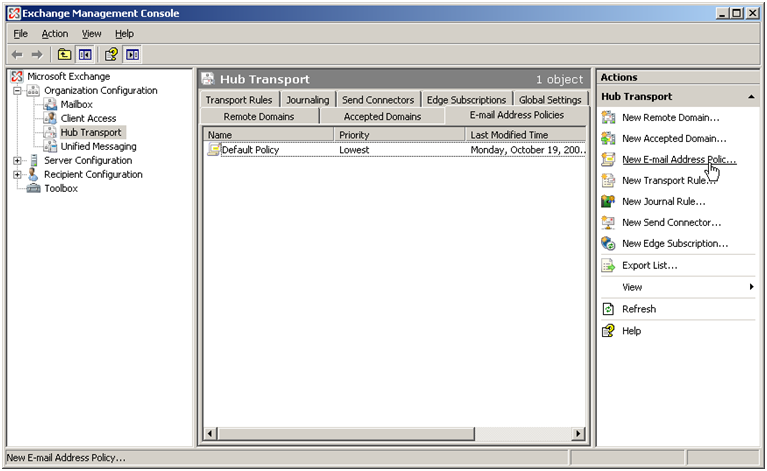
Open up Organization Configuration, Hub Transport, E-Mail Address Policies and click on New E-mail Address Policy in the actions pane.
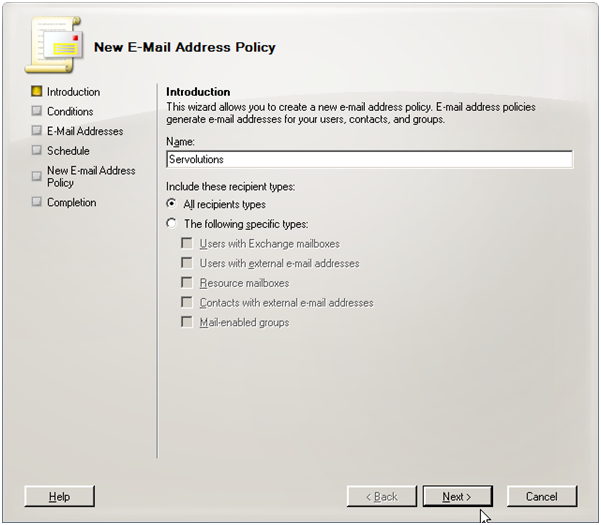
You can assign a (non-essential) name to the new policy:
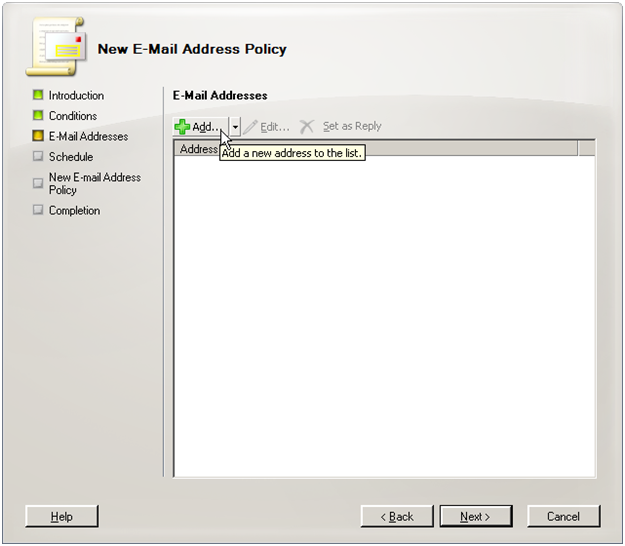
And then add a new E-Mail Addresses format on the next page:
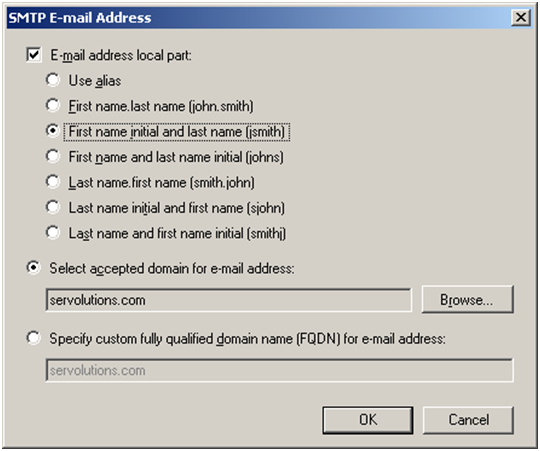
Enter your domain name and select one of the formats:
5. Installing and configuring POPcon or POPcon PRO
After going through the above 4 steps your Exchange is configured to send out email but it still can't pull down email from POP3 or IMAP mailboxes on your provider server. For this you need to install and configure POPcon.
Configuring POPcon is quite straightforward. You need to follow these steps:
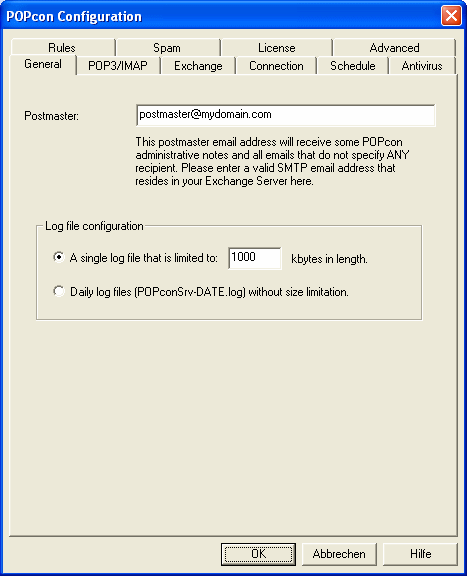
a) Configure a Postmaster email address on the GENERAL configuration tab.
b) Add one or more POP3 mailboxes on the POP3/IMAP tab.
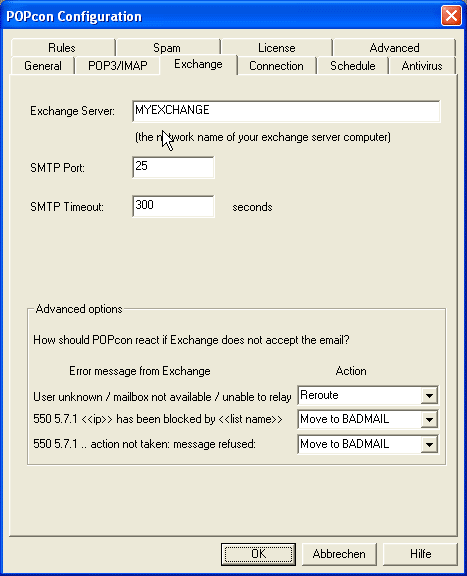
c) Configure the Exchange server name on the EXCHANGE configuration tab.
Download and run the self-extracting installer of POPcon or POPcon PRO and follow the instructions during the installation. It will install the POPcon Administrator program and the POPcon service that runs in the background on your system.
Run POPcon Adminstrator from Start > Programs > POPcon
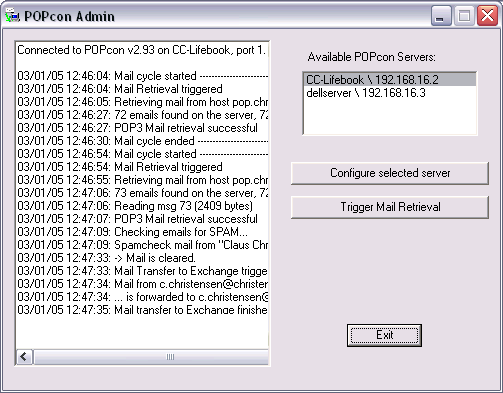
POPcon Screenshot
Click on "Configure" to open up the POPcon configuration screen.
a) Configure a Postmaster email address on the GENERAL configuration tab.
On this first configuration page you only need to enter the email address of your Postmaster or Administrator user. The Postmaster will receive all emails without a valid recipient as well as general POPcon status notifications. It is very important to define a real email address from inside your exchange server here because mails can be lost irretrievably if POPcon forwards some mail with no recipient information to the postmaster and that account does not exist in your exchange server.
You can leave the log file options to their default settings for now.
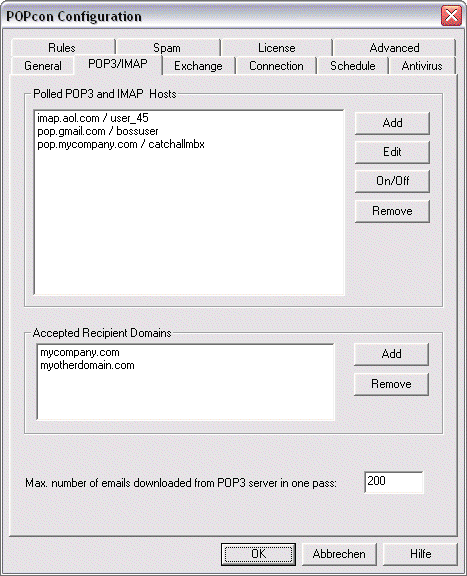
Next go to the POP3/IMAP tab to configure the POP3 or IMAP mailbox accoutns you want POPcon to download email from.
b) Add one or more POP3 mailboxes on the POP3/IMAP tab.
POPcon PRO collects mail from as many POP3 accounts you like. Just click on Add to add another POP3 host or account to the list of Polled POP3 Hosts. For each server or account you need to fill in the POP3 server settings as shown below.
If you are using catch-all style mailboxes (mailboxes that receive email for a whole domain, regardless of the recipient part before the "@") POPcon needs to filter recipients from incoming mail so only the recipients at your own internet domain are accepted. Please add the domain you consider your own in the "Accepted Recipient Domains" box. This is the same domain you configured earlier in the Exchange Default Policy.
Individual account settings
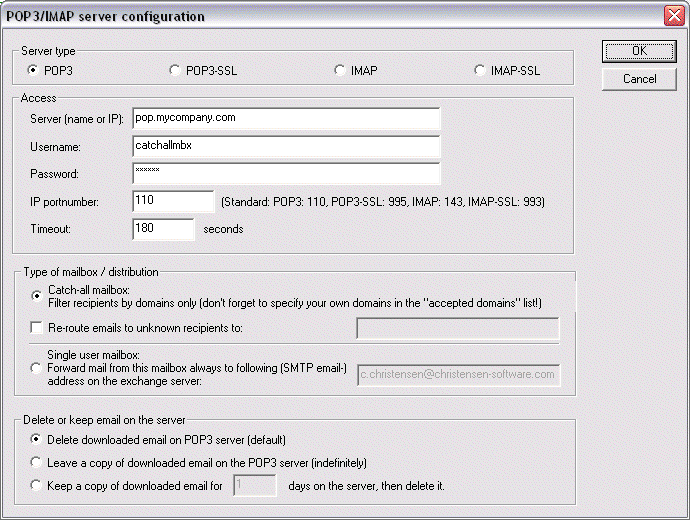
This dialog lets you input the specifics about a POP3 or an IMAP server you want to have polled by POPcon PRO.
This is the information POPcon PRO needs to know about each server:
Server type:
Here you can select on the four supported server types:
POP3: Default. POP3 servers are by far the most common mail server types on the internet.
POP3-SSL: Some POP3 Servers need SSL encryption enabled for the connection in order to protect passwords and sensitive information. Choose this type to have a SSL-encrypted connection to a POP3 server.
IMAP: IMAP Servers are also quite common and theoretically allow the client to manipulate email folders and move email between folders online. In our case the protocol is used to download email from the INBOX of the IMAP server to your exchange server.
IMAP-SSL: Supports SSL connections to IMAP servers for added protection.
Access:
Configure the server name, account name and password to connect to the mail server here.
Servername: The name the server you want to have polled. You can also enter the IP address directly.
Username: The username needed to log into your POP3 or IMAP mail server.
Password: The password needed to log into your mail server.
IP portnumber: Almost always the TCP/IP port for POP3 mail is 110. Under some circumstances, internet routers or firewalls change the port number. Please ask your network administrator or internet provider. The standard port for POP3-SSL is 995, for IMAP it is 143 and for IMAP-SSL this should be set to 993.
Timeout: Leave this to the default value.
Please ask your POP3 mailbox hosting provider if you do not have the above information.
Type of mailbox / distribution:
POPcon PRO supports both catch-all and single user mailboxes
Catch-all mailbox ("*@domainname.com"): For this type of mailbox, POPcon PRO will distribute the email retrieved from this server according to what it finds in the TO:, CC:, BCC: and other header-fields of the mail. If you choose this option, don’t forget to add your internet domain name(s) to the "Accepted Recipient Domains" box. on the POP3/IMAP configuration dialog
Single user mailbox ("user@domainname.com"): This type of mailbox receives email for only one specific Exchange mailbox. You need to specify the receiver of the email here. POPcon PRO will then direct all mail retrieved from this server to the recipient email address given here.
Delete / keep email on the server:
This block allows you to configure POPcon PRO to either delete email after downloading or keep it on your POP3 or IMAP server for a specified amount of time or indefinitely.
Delete downloaded email: This is the default setting – POPcon PRO will delete the Email on your POP3 or IMAP server after successfully downloading it.
Leave a copy of downloaded email (indefinitely): This option will cause POPcon PRO to leave a copy of the email on the server. Only use this option during testing or when you are sure the mail will be deleted eventually, i.e. by another system periodically downloading an deleting email.
Leave a copy of downloaded email for n number of days: Causes POPcon PRO to leave a copy of the email on the POP3/IMAP server for the specified number of days before deleting it. You can use this option to allow access to a single POP3 or IMAP mailbox by two different systems.
c) Configure the Exchange server name on the EXCHANGE configuration tab.
On this configuration screen you can specify the Exchange™-(SMTP) Server you want the mail to be directed to. Normally this will be the computer name of your Exchange™ server (like "MYSERVER").
You can leave all other settings default
These three steps to configure POPcon will provide you with a working set-up. Test it out by confirming the new configuration with OK and then use the "Trigger mail retrieval" button on the POPcon Administrator main screen to start the first mail download. You can follow what is happening in the scrolling log display on that screen. Watch out for any error messages there. There is also a POPcon log file (c:\program files\POPcon\POPconSrv.log – open with notepad) that you can view at your leisure.
